

- Jeep Cherokee Push Button Start Not Working: Troubleshooting Tips To Get You Back on the Road Fast! - 11 November 2023
- Haval H2 Problems: The Complete Troubleshooting Guide - 11 November 2023
- Gwm P Series Problems: Troubleshooting Guide for Common Issues - 11 November 2023
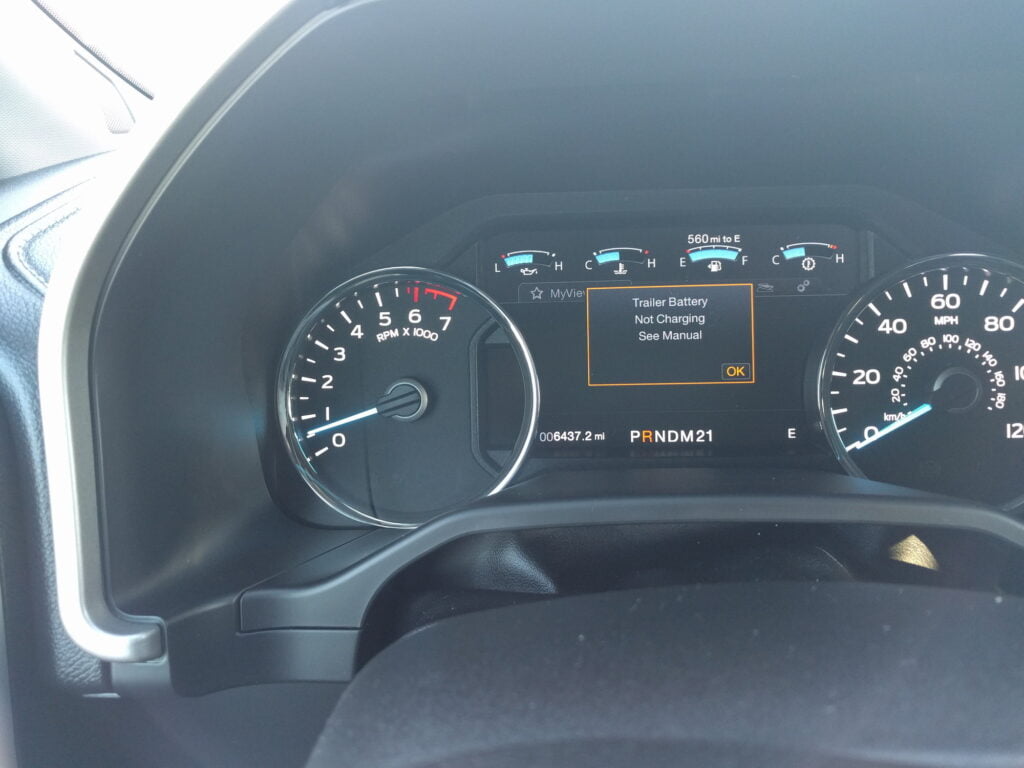
To fix trailer battery not charging on an F150, check the battery connections and clean them if they are dirty or corroded. Then, inspect the trailer brake controller and ensure it is properly connected to the vehicle’s electrical system.
Having a trailer battery that is not charging can be frustrating, especially when you’re relying on it for your towing needs. The lack of power can pose various challenges, from not being able to operate trailer lights to a drained battery when you need it the most.
Thankfully, resolving this issue can be quite simple, as it often comes down to addressing the battery connections and ensuring proper connectivity between the trailer brake controller and the F150’s electrical system. By following a few straightforward steps, you can quickly get your trailer battery charging again and ensure a smooth towing experience.
Understanding The Trailer Battery Charging System
In order to fix a trailer battery that is not charging in your F150, it is crucial to first understand the trailer battery charging system. This system consists of various components that work together to ensure your trailer battery gets charged efficiently. By familiarizing yourself with these components and how they operate, you can troubleshoot the issue and resolve it effectively.
Components Involved In The Trailer Battery Charging System
The trailer battery charging system comprises several crucial components that play vital roles in the charging process. These include:
- Auxiliary power circuit: This circuit connects the vehicle’s electrical system to the trailer’s electrical system, enabling power transfer between the two.
- 12-volt fused power lead: This lead carries the electrical power from the vehicle’s battery to the trailer’s battery, allowing charging to occur.
- Trailer power relay: The power relay controls the flow of electrical current between the vehicle and the trailer, ensuring that the trailer battery receives an optimal charge.
- Trailer battery: This is the battery present in the trailer that needs to be charged. It stores electrical energy to power various trailer components when the vehicle is not running.
How The System Works To Charge The Trailer Battery
The trailer battery charging system operates in a systematic manner to ensure the trailer battery gets charged effectively. Here’s a step-by-step breakdown of how the system works:
- When the vehicle’s engine is running, the alternator generates electrical power and supplies it to the vehicle’s battery.
- The vehicle’s auxiliary power circuit connects to the trailer’s electrical system, establishing a connection between the two.
- Through the 12-volt fused power lead, the electrical power flows from the vehicle’s battery to the trailer’s battery, initiating the charging process.
- The trailer power relay regulates the flow of electrical current, preventing overcharging or undercharging of the trailer battery. It ensures that the charging process is efficient and safe.
- The trailer battery securely stores the electrical energy received from the vehicle, allowing it to power various components such as lights, appliances, or hydraulic systems when the vehicle is not running.
By understanding how the system works and the components involved, you can identify potential issues that may be causing the trailer battery not to charge in your F150. With this knowledge, you can take the necessary steps to troubleshoot and fix the problem, ensuring that your trailer battery gets the power it needs for smooth and uninterrupted operation.
Common Causes Of Trailer Battery Not Charging
When you’re gearing up for an outdoor adventure with your trusty F150, there’s nothing more frustrating than discovering that your trailer battery isn’t charging. This can put a damper on your plans and leave you feeling clueless about what to do next. Thankfully, there are a few common causes for a trailer battery not charging that you can troubleshoot to get back on the road.
H3loose Or Corroded Connections/h3
One of the most common culprits when it comes to a trailer battery not charging is loose or corroded connections. Over time, the connecting points between the battery and the trailer can become loose or covered in corrosive buildup. This can prevent the flow of electricity and inhibit the charging process.
To check for loose connections, start by inspecting the battery terminals. Make sure they’re securely fastened to the battery posts and that there’s no wiggle room. If the terminals are loose, tighten them using a wrench or pliers.
Corrosion can be removed by cleaning the terminals with a wire brush or a mixture of baking soda and water. Scrub away any residue until the connections are clean and shiny. Once everything is secure and clean, retest the battery charging to see if the problem is resolved.
H3faulty Wiring Or Fuses/h3
Faulty wiring or fuses can also be to blame for a trailer battery not charging. Wiring and fuses are responsible for carrying power from your vehicle’s battery to the trailer battery. If there’s a break in the wiring or a blown fuse, it can disrupt the charging process.
Start by inspecting the wiring connections between your F150 and the trailer. Look for any signs of fraying, breaks, or loose connections. If you notice any issues, repair or replace the wiring as needed.
Next, check the fuses in both your vehicle’s fuse box and the trailer fuse box. A blown fuse can easily be replaced with a new one of the same amperage. Consult your vehicle’s manual for the specific location of the fuse boxes and the appropriate fuses to use.
H3defective Charging Components/h3
If you’ve checked all the connections and wiring and the trailer battery is still not charging, the issue could lie with the charging components themselves. Defective parts, such as the converter or voltage regulator, can disrupt the charging process and require replacement.
To determine if the charging components are faulty, you may need to consult a professional or refer to your vehicle’s manual for guidance. They can help you diagnose the problem and recommend the necessary repairs or replacements.
Remember, troubleshooting the common causes of a trailer battery not charging can save you time, money, and frustration. By checking for loose connections, faulty wiring or fuses, and defective charging components, you can get your F150 and trailer back in action and ready for your next adventure.
Troubleshooting The Trailer Battery Not Charging Issue
When your trailer battery is not charging, it can be frustrating and inconvenient, especially if you rely on the battery for powering various devices and appliances. However, with a little troubleshooting, you can identify the underlying problem and find a solution.
Checking The Trailer Battery Voltage With A Multimeter
One of the first steps in troubleshooting a trailer battery that is not charging is to check its voltage using a multimeter. This simple tool allows you to measure the electrical potential difference of the battery, giving you an idea of its current state of charge.
- Set your multimeter to the DC voltage setting.
- Connect the black probe to the battery’s negative terminal and the red probe to the positive terminal.
- Read the voltage displayed on the multimeter.
If the voltage is significantly below the battery’s rated voltage, it may indicate a problem with the battery’s charging system or a dead battery that needs to be replaced.
Inspecting And Cleaning The Battery Terminals And Connections
Corroded or loose battery terminals and connections can prevent proper charging of the trailer battery. Inspecting and cleaning these components can often resolve the charging issue.
To inspect and clean the battery terminals and connections, follow these steps:
- Ensure the trailer battery is disconnected from any power source.
- Remove the battery cables from the battery terminals, starting with the negative cable (black).
- Inspect the terminals and cables for any signs of corrosion, such as white or greenish deposits.
- If corrosion is present, mix a solution of equal parts baking soda and water.
- Using a wire brush or a battery terminal cleaner, scrub the terminals and cables with the baking soda solution to remove the corrosion.
- Rinse the terminals and cables with clean water and dry them thoroughly.
- Reconnect the battery cables, starting with the positive cable (red).
By ensuring clean and secure connections, you can improve the flow of electricity and increase the chances of the trailer battery charging properly.
Testing The Trailer’s Wiring And Fuses
In some cases, the issue may lie within the trailer’s wiring and fuses. Faulty wiring or blown fuses can disrupt the charging process and prevent the battery from receiving the necessary power.
To test the trailer’s wiring and fuses, you can follow these steps:
- Inspect the wiring connections for any signs of damage, such as frayed wires or loose connections. Repair or replace any faulty wiring as needed.
- Check the fuses in the trailer’s fuse box. Replace any blown fuses with ones of the same rating.
- Use a circuit tester to check if there is power flowing through the wiring system.
Examining The Charging Components For Any Defects
If all the previous steps have been followed and the trailer battery still refuses to charge, it’s time to examine the charging components for any defects. This includes the battery charger, voltage regulator, and any other related components.
Inspect these components for any visible signs of damage, such as burned-out wires or blown capacitors. If any defects are found, it may be necessary to replace the faulty components to restore proper charging functionality.
Remember, if you are unsure or uncomfortable performing any of these troubleshooting steps yourself, it’s always advisable to seek professional assistance.
Step-by-step Guide To Fixing Trailer Battery Not Charging
Tips For Maintaining A Healthy Trailer Battery Charging System
Having a trailer battery that is not charging can quickly turn a fun road trip into a frustrating experience. To avoid this inconvenience, it’s crucial to take proper care of your trailer’s battery charging system. By regularly cleaning and maintaining battery terminals and connections, checking the charging system before every trip, and properly storing and charging the battery during periods of non-use, you can ensure a reliable power source for your trailer. Below, we’ll delve into each of these tips in more detail.
Regularly Cleaning And Maintaining Battery Terminals And Connections
One of the most common reasons for a trailer battery not charging is dirty or corroded battery terminals and connections. Over time, these components can accumulate dirt, grime, and a build-up of corrosion, which can impede the flow of electricity. To prevent this issue, schedule regular maintenance sessions to clean your battery terminals and connections.
To clean the battery terminals, start by disconnecting the battery cables, ensuring positive and negative terminals are detached. It is essential to follow proper safety precautions and wear gloves and eye protection during this process. Use a battery terminal cleaner or a mixture of baking soda and water to remove any corrosion or residue on the terminals. Scrub the terminals with a wire brush or a battery terminal cleaning tool until they are clean and shiny. Finally, rinse the terminals with water and let them dry before re-attaching the cables, ensuring a tight connection.
Similarly, clean the battery connections by removing the cables from the terminals and cleaning both the cable ends and the terminals using the same cleaning solution. By keeping the terminals and connections clean and free from any build-up, you can help ensure a proper flow of electricity, allowing your trailer battery to charge effectively.
Checking The Trailer’s Charging System Before Every Trip
Prior to embarking on a road trip or towing your trailer, it is vital to perform a thorough check of the trailer’s charging system. This simple step can save you from significant headaches and unexpected power outages while on the road.
To check the charging system, start by inspecting the battery for any physical damages or signs of wear. Look for cracks, bulges, or leaks and ensure the battery is securely mounted and properly secured in its enclosure or battery box.
Next, inspect the battery cables and wiring connections for any signs of damage or looseness. Look for frayed wires, loose connectors, or any other noticeable issues. If you spot any problems, address them immediately to avoid any potential power disruptions.
Finally, use a voltmeter or a multimeter to measure the battery voltage. Connect the voltmeter to the battery terminals – positive (red) to positive and negative (black) to negative – and check the reading. A fully charged battery should display around 12.6 to 12.8 volts. Anything significantly lower may indicate an underlying problem with the battery or charging system.
Properly Storing And Charging The Trailer Battery During Periods Of Non-use
When your trailer will be sitting idle for an extended period, such as during the winter or between camping trips, it is crucial to properly store and charge the trailer battery. This will help preserve its lifespan and ensure it remains in good working condition.
Start by disconnecting the battery from the trailer to prevent any parasitic drains. Clean the battery terminals and connections as mentioned earlier, and ensure they are completely dry. Then, store the battery in a cool, dry place away from direct sunlight and extreme temperatures.
To maintain the battery’s charge during storage, you have a few options. One is to leave the battery connected to a trickle charger or a battery maintainer, which will provide a low, constant charge to keep the battery topped up. Another option is to disconnect the battery completely and charge it periodically, generally every 4 to 6 weeks, to avoid deep discharging. Whichever method you choose, always follow the manufacturer’s guidelines and ensure proper ventilation to prevent any potential hazards.
By following these tips for maintaining a healthy trailer battery charging system, you can minimize the risk of encountering a trailer battery that is not charging. This proactive approach will help ensure that you have a reliable power source for all your future adventures. Remember, regular maintenance and checks are the keys to a trouble-free towing experience!

Credit: www.amazon.com
Frequently Asked Questions Of How To Fix Trailer Battery Not Charging F150
Why Is My F150 Trailer Battery Not Charging?
The F150 trailer battery may not be charging due to a faulty wiring connection or a defective battery charger.
How Do I Diagnose A Trailer Battery Not Charging Issue?
To diagnose a trailer battery not charging issue, check the wiring connections, test the battery voltage, and inspect the battery charger for any damages or defects.
What Should I Do If My F150 Trailer Battery Is Not Holding A Charge?
If your F150 trailer battery is not holding a charge, you may need to replace it with a new one or have it recharged by a professional.
How Can I Fix A Trailer Battery That Is Not Charging While Driving?
To fix a trailer battery not charging while driving, check the vehicle’s alternator, ensure proper wiring connections, and consider installing a battery charging system with a higher output.
Can A Blown Fuse Cause The F150 Trailer Battery Not To Charge?
Yes, a blown fuse can prevent the F150 trailer battery from charging. Check the fuse box for any blown fuses and replace them if necessary to resolve the issue.
Conclusion
To summarize, troubleshooting a trailer battery that’s not charging on an F150 can be a straightforward process. By checking the power connection, inspecting the battery and charger, and ensuring proper wiring, you can identify and resolve the issue. Performing regular maintenance and keeping an eye on the battery’s condition will further optimize its performance.
Remember, a well-charged trailer battery ensures a smooth and safe journey.
