

- Jeep Cherokee Push Button Start Not Working: Troubleshooting Tips To Get You Back on the Road Fast! - 11 November 2023
- Haval H2 Problems: The Complete Troubleshooting Guide - 11 November 2023
- Gwm P Series Problems: Troubleshooting Guide for Common Issues - 11 November 2023
To check the oil level after an oil change, run the engine and check for leaks immediately after the oil change. Turn the engine off, wait a few minutes, and then check the oil level.
It’s important to check the oil level at every gas fill-up. Simply turn the engine off, wait a few minutes, and check the oil level again. This regular practice ensures that your engine’s oil level is always within the recommended range for optimal performance and protection.
Why Checking Oil Level After An Oil Change Is Important
After an oil change, it is important to check the oil level to ensure proper lubrication and prevent engine damage. Start by running the engine and checking for leaks, then turn off the engine and wait a few minutes before checking the oil level using the dipstick.
It is also recommended to check the oil level at every gas fill-up to maintain optimal engine performance.
Ensuring Engine Health And Longevity
Checking the oil level after an oil change is a crucial step in maintaining the health and longevity of your engine. The oil in your engine plays a vital role in lubricating its components and reducing friction. By ensuring the oil level is correct, you can prevent excessive wear and tear on these components, ultimately extending the lifespan of your engine.
Regularly checking the oil level allows you to catch any potential issues early on. Low oil levels can result in inadequate lubrication, leading to increased friction, heat, and wear on engine parts. This can cause expensive damages, such as engine seizing or premature failure. By taking a few minutes to check the oil level, you can identify any potential problems and take appropriate action to avoid costly repairs.
Preventing Oil-related Issues
Checking the oil level after an oil change is especially important for preventing oil-related issues. Over time, oil can break down and become contaminated with dirt, debris, and byproducts of combustion. This can cause the oil to lose its effectiveness in lubricating and protecting the engine. By regularly checking the oil level, you can ensure that fresh, clean oil is present in the engine, minimizing the risk of oil-related problems.
Additionally, checking the oil level allows you to monitor for oil leaks. Leaks can occur due to various reasons, including faulty gaskets or seals. If left unchecked, oil leaks can lead to a loss of oil, compromising engine lubrication and potentially causing engine damage. By regularly checking the oil level and inspecting for leaks, you can address any issues promptly and prevent further damage.
Maintaining Optimal Performance
Checking the oil level after an oil change is key to maintaining optimal engine performance. The oil in your engine not only lubricates its components but also helps to regulate temperature and remove contaminants. If the oil level is too low, the engine may not function at its best, resulting in reduced performance and efficiency.
Monitoring the oil level allows you to ensure that the engine has sufficient oil to operate at its peak. Keeping the oil level within the recommended range helps to maintain proper lubrication, cooling, and filtration. This, in turn, allows the engine to perform optimally, delivering the power and efficiency you expect.
Steps To Check Oil Level After An Oil Change
After an oil change, it is important to check the oil level by running the engine, turning it off, waiting a few minutes, and checking the oil level using the dipstick. This should be done regularly, especially at every gas fillup, to ensure the oil level is adequate.
Remember to check for leaks as well.
Checking the oil level in your vehicle is an essential part of routine maintenance, especially after an oil change. By monitoring the oil level, you can ensure that your engine is properly lubricated and running smoothly. Here are the steps to follow when checking the oil level after an oil change:
Start The Engine And Check For Leaks Immediately After The Oil Change
Wait A Few Minutes And Turn Off The Engine
Use The Dipstick To Check The Oil Level
Insert The Dipstick Into The Tube Slowly And Push It All The Way Down
Withdraw The Dipstick And Examine The Oil On The Tip
Check The Oil Level At Every Gas Fill-up
Turn Off The Engine And Wait A Few Minutes Before Checking
Once the oil change is complete, start the engine and quickly inspect the area around the oil filter and drain plug for any signs of leakage. This step is crucial to address any potential issues before they escalate.
After running the engine for a few minutes, give it some time to cool down. Turn off the engine and wait for a few minutes to allow the oil to settle in the oil pan.
Locate the oil dipstick in your vehicle’s engine bay. It is usually labeled and has a bright-colored handle for easy identification. Pull out the dipstick.
Carefully insert the dipstick back into the tube, ensuring that it goes all the way down. Push it in slowly to prevent any oil splatter.
Once the dipstick is fully inserted, pull it out again. Take a close look at the oil residue left on the tip of the dipstick. The oil level should be between the minimum and maximum marks indicated on the dipstick. If the level is below the minimum mark, you may need to add more oil.
Monitoring your oil level regularly is crucial for maintaining the health of your engine. Make it a habit to check the oil level every time you fill up your gas tank. This way, you can detect any significant changes in oil consumption or potential leaks early on.
Once you have checked the oil level, turn off the engine again and wait for a few minutes. This step allows the oil to settle back into the oil pan before you perform any subsequent checks or add more oil, if necessary.
Tips For Proper Oil Level Checking
Checking the oil level in your vehicle is an essential maintenance task that should be performed regularly to ensure optimum engine performance. To ensure accurate results, follow these tips for proper oil level checking:
Use High-quality Oil And Filters For Optimal Results
Using high-quality oil and filters is crucial for maintaining the health and longevity of your engine. Investing in premium synthetic or conventional oil and reputable filters can minimize the risk of oil contamination and enhance overall engine performance. Be sure to consult your vehicle’s owner manual or speak with a trusted mechanic to determine the correct oil type and filter to use.
Park The Vehicle On A Level Surface To Ensure Accuracy
When checking the oil level, it is important to park your vehicle on a level surface. This ensures that the oil is distributed evenly in the engine, preventing any inaccuracies in measuring the oil level. Parking on an incline or decline may cause the oil to pool towards one side of the engine, leading to inaccurate readings.
Avoid Overfilling Or Underfilling The Oil
Overfilling or underfilling the oil in your engine can have negative consequences on its performance. Overfilling can lead to excessive pressure, oil foaming, and potential damage to engine seals. Underfilling, on the other hand, can result in insufficient lubrication and increased wear and tear on engine components. To ensure the proper oil level, use the dipstick method or follow the manufacturer’s guidelines for oil volume.
By following these tips for proper oil level checking, you can maintain the health and performance of your engine while maximizing its longevity. Regular oil level checks are a simple yet essential maintenance task that should not be overlooked.
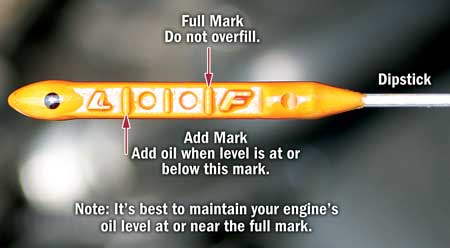
Credit: www.machinerylubrication.com
Signs Of Low Oil Level After An Oil Change
To check the oil level after an oil change, start the engine and check for any leaks. After turning off the engine, wait a few minutes before checking the oil level. It is also recommended to check the oil level at every gas fill-up.
Insert the dipstick into the tube, withdraw it, and check the tip for oil.
Checking The Texture Of The Oil On The Dipstick
One of the easiest ways to determine if your oil level is low after an oil change is by checking the texture of the oil on the dipstick. Start by inserting the dipstick into the tube slowly and pushing it all the way down. Now, withdraw it and pay close attention to the tip of the dipstick, which should ideally have oil on it.
Clean Oil Indicates Normal Oil Level
If the dipstick indicates that the oil level is low, touch the end of the dipstick with two fingers and feel the texture of the oil. If the oil is clean and smooth, it suggests that the oil level is normal. Clean oil is typically golden or amber in color and free from any particles or contaminants. In this case, you may not need to add more oil as the level is within the desired range.
Low Oil Level May Be Indicated By A Low Texture Or Color Change
However, if the oil on the dipstick feels low in texture or has undergone a significant color change, it may indicate a low oil level. Low texture oil can feel gritty or thin, while a color change might involve the oil turning dark or sludgy. In such cases, it is crucial to add the necessary amount of oil to bring the level back to normal.
Remember, checking your oil level regularly is essential for the health and longevity of your engine. Ignoring low oil levels can lead to increased friction, heat, and potential damage to engine components. Therefore, it is recommended to follow the manufacturer’s guidelines and check your oil level at regular intervals to ensure optimal engine performance.
Common Mistakes To Avoid When Checking Oil Level After An Oil Change
Checking the oil level after an oil change is an essential task to ensure that your engine is properly lubricated. However, there are common mistakes that many people make when performing this important check. By being aware of these mistakes and avoiding them, you can ensure accurate readings and keep your engine running smoothly.
Topping Up To The Specified Oil Level Immediately After An Oil Change
One common mistake is topping up the oil to the specified level immediately after an oil change. It’s important to note that the oil needs time to circulate throughout the engine. By only filling up to the minimum mark initially, you allow for proper oil circulation and prevent overfilling. After running the engine and letting it warm up, you can then top up the oil to the specified level.
Not Allowing The Engine To Warm Up Before Checking The Oil Level
Another mistake to avoid is not letting the engine warm up before checking the oil level. When the engine is cold, the oil may not have fully circulated, giving you an inaccurate reading. To get an accurate measurement, start the engine and let it run for a few minutes to warm up the oil. Then, turn off the engine and wait a few minutes for the oil to settle before checking the level.
To check the oil level correctly, follow these steps:
- Park your car on a level surface and turn off the engine.
- Open the hood and locate the dipstick, which is usually labeled with a brightly colored handle.
- Insert the dipstick into the oil tube slowly and push it all the way down.
- Withdraw the dipstick and examine the oil on the tip. It should be between the minimum and maximum marks on the dipstick.
- If the oil level is low, add oil gradually and recheck the level until it reaches the specified range. Be careful not to overfill.
- Remember to put the dipstick back in its proper place and close the hood securely.
By avoiding these common mistakes and following the correct procedure to check the oil level after an oil change, you can ensure the longevity and performance of your engine. Regularly checking the oil level and maintaining it at the specified range will help prevent engine damage and costly repairs in the long run.
Frequently Asked Questions Of How To Check Oil Level After Oil Change
How Do You Check Oil After Oil Change?
After an oil change, start the engine and check for leaks. Then, turn off the engine and wait a few minutes. Insert the dipstick into the tube and push it all the way down. Withdraw it and check the tip for oil.
Repeat this process every time you fill up with gas.
How Long After Oil Change Can You Check Oil Level?
You should wait a few minutes after turning off the engine to check the oil level after an oil change. Additionally, it’s recommended to check the oil level at every gas fill-up. Insert the dipstick into the tube, withdraw it, and look at the tip for oil.
Do You Check The Oil When The Engine Is Hot Or Cold?
It is best to check the oil level when the engine is cold. Run the engine, turn it off, wait a few minutes, and then check the oil level to ensure accuracy.
How Soon After An Oil Change Should I Check The Oil Level?
Running the engine and checking for leaks right after an oil change is recommended. After turning off the engine, wait a few minutes before checking the oil level.
How Often Should I Check The Oil Level After An Oil Change?
It is recommended to check the oil level at every gas fill-up. After turning off the engine, wait a few minutes and check the oil level.
Conclusion
Checking the oil level after an oil change is crucial to ensure the proper functioning of your vehicle’s engine. Running the engine and checking for leaks immediately after the oil change is essential. Checking the oil level regularly at every gas fill-up is recommended.
Inserting the dipstick into the tube, withdrawing it, and examining the oil on the tip is a simple yet effective method. It’s worth noting that low oil levels should be addressed promptly for optimal engine performance. Regular maintenance and attention to oil levels will help prolong the life of your engine.
