carinsiderhub.com

Car Oil

Rev your engines and fasten your seat belts, dear readers! We’re about to take an exhilarating deep dive into the fascinating world of car oils in our new blog category. Through simple explanations and expert insights, we’ll unveil the mysteries behind what keeps your engine purring smoothly. Ready for a journey that’s as slick as the oil in your car? Buckle up!

What Causes a Car'S Engine to Burn Engine Oil

What Causes a Car’s Engine to Burn Engine Oil: Unveiling the Root Culprits

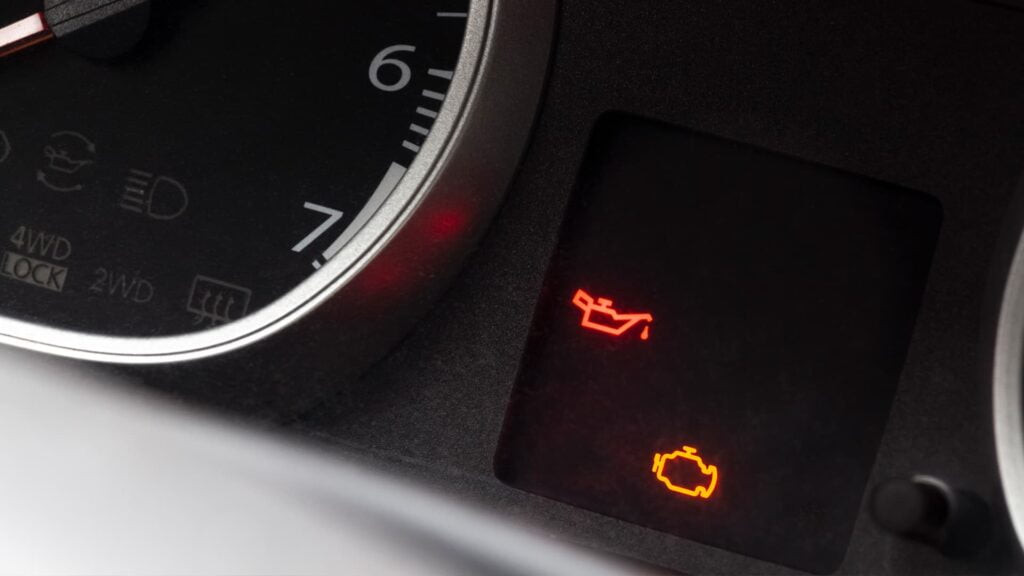
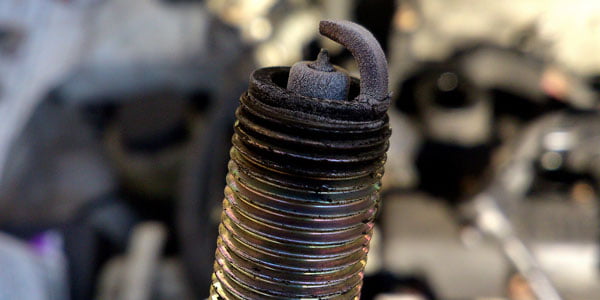
A car’s engine burns engine oil due to worn-out piston rings or seals, leading to oil leakage. This can occur if the engine is old or if it has been overheated. It is important to address this issue promptly as burning engine oil can cause various problems, including reduced engine performance and increased emissions. In addition, it can lead to a buildup of carbon deposits, damaged spark plugs, and increased fuel consumption. Regular maintenance and frequent oil changes can help prevent engine oil from burning and ensure the proper functioning of the engine. Understanding Car Engine Oil Burning Definition And Explanation Of Car Engine Oil Burning Car engine oil burning refers to the process in which the engine’s oil is consumed or lost at a faster rate than usual. When a car’s engine is burning oil, it means that the oil is being used up either through combustion or leaking. This can lead to various issues and is a symptom of potential underlying problems within the engine. Oil burning can occur due to a variety of reasons, including worn-out piston rings, valve seals, or gaskets. These components play a crucial role in keeping the engine lubricated and preventing oil leakage. When these parts deteriorate, oil can escape into the combustion chambers or leak externally, resulting in the burning of engine oil. Besides the physical components, environmental factors such as extreme temperatures can also contribute to oil burning. High heat can cause the oil to break down and evaporate more quickly, leading to a reduced lubrication effect and increased oil consumption. Importance Of Maintaining Proper Oil Levels In A Car Engine Maintaining proper oil levels in a car engine is vital to its overall health and performance. It ensures that the engine’s moving parts are properly lubricated, reducing friction and preventing excessive wear and tear. Here are a few important reasons to keep a vigilant eye on your car’s oil levels: Optimal Performance: Adequate oil levels help maintain the engine’s temperature and prevent it from overheating. When the engine runs too hot, it can lead to damage and reduced performance. Engine Longevity: Proper lubrication helps extend the lifespan of the engine’s internal components, reducing the risk of major breakdowns and costly repairs. Regularly monitoring and replenishing oil levels can contribute significantly to the longevity of your car engine. Fuel Efficiency: A well-lubricated engine operates more efficiently, resulting in better fuel economy. Insufficient oil levels can cause increased friction, which in turn requires the engine to work harder and consume more fuel. Early Problem Detection: Monitoring oil levels provides an opportunity to detect potential issues within the engine early on. Abnormal oil consumption, such as burning oil, can be an indicator of underlying problems that need attention, allowing for prompt repair and maintenance. Overall, maintaining proper oil levels is essential for the smooth functioning of your car’s engine. It not only promotes longevity and performance but also helps identify problems before they escalate into more significant issues. Regularly checking and replenishing the oil level can save you from costly repairs and ensure your engine stays in optimal condition. Signs And Symptoms Of Engine Oil Burning Engine oil burning in a car can cause several signs and symptoms, including blue smoke from the exhaust, oil leaks, decreased oil levels, and a burning odor. This issue is often caused by worn piston rings, faulty valve seals, or a damaged gasket. Regular inspection and maintenance can help prevent engine oil burning. Engine oil is a critical component in any car’s operation, lubricating the many moving parts to prevent friction and ensure smooth performance. However, sometimes the engine can develop issues that cause it to burn oil. This can lead to a range of problems and should be addressed promptly. To help you identify whether your engine is burning oil, we will discuss some common signs and symptoms that you should look out for. Common Signs That Indicate Engine Oil Burning Excessive oil consumption: If your car is burning oil, you may notice that you need to top up the oil frequently. Engine oil is typically topped up during regular maintenance, but if you find yourself adding oil between oil changes, it could be a sign that your engine is burning oil. Blue smoke from the exhaust: One of the most noticeable signs of oil burning is the presence of blue smoke coming from the exhaust pipe. If you observe this, especially during acceleration or after idling for a while, it is a strong indication that oil is being burned within the engine. Unusual odors: Another clue that your engine is burning oil is the presence of unusual odors. These smells can range from a faint burning oil scent to a more pungent and noticeable odor. If you catch a whiff of something unusual while driving, it is worth investigating further. Loss of engine power: Engine oil helps to lubricate the various engine components, ensuring they work smoothly together. When oil is being burned, the lubrication is compromised, leading to a potential loss of engine power. If you notice a decrease in acceleration or overall performance, it could be a sign of oil burning. Spark plug fouling: Oil burning can also impact the performance of your spark plugs. If oil is reaching the spark plugs, they may become fouled or covered in oil residue. This can cause misfires, leading to rough idling, reduced fuel efficiency, and potential engine damage. Identifying Visual Or Auditory Cues Of Oil Burning Aside from the aforementioned signs, there are additional visual and auditory cues that can help you determine if your engine is burning oil. These cues may require closer observation or inspection: Oil leaks: Check for any visible oil leaks under your car or around the engine compartment. A significant oil leak could indicate that oil is being burned within the engine. Excessive carbon buildup: Look for excessive carbon deposits on the spark plugs or elsewhere in the engine. This can be a sign that oil is being burned

What Causes a Car’s Engine to Burn Engine Oil: Unveiling the Root Culprits Read More »

How Much Does an Oil Leak Cost to Repair

How Much Does an Oil Leak Cost to Repair? Uncover the Financial Impact Now!

An oil leak repair typically costs between $150 to $1200 depending on the severity of the leak and the type of repair needed. Oil leaks can be a common occurrence in vehicles and can result from various issues such as a worn-out gasket, loose drain plug, or a faulty oil filter. When left unaddressed, oil leaks can lead to more serious engine damage and higher repair costs. Therefore, it is crucial to have an oil leak promptly repaired by a professional mechanic. The cost of repair can vary based on factors such as the extent of the leak, the location of the leak, and the make and model of the vehicle. We will explore the factors that affect the cost of an oil leak repair and provide some tips on how to prevent oil leaks in the future. Credit: www.theguardian.com Understanding The Costs Associated With Oil Leaks Oil leaks can cause significant damage to your vehicle if left unaddressed, resulting in costly repairs. Understanding the costs associated with oil leaks is crucial for every car owner. In this article, we will explore the common causes of oil leaks, the potential damage they can cause, factors influencing the cost of repairs, and the importance of timely repairs. H3common Causes Of Oil Leaks/h3 Oil leaks can stem from various factors, and it is important to identify the root cause to determine the appropriate repair solution. Some common causes of oil leaks include: Worn or damaged gaskets and seals Loose or faulty oil drain plugs Cracked oil pan Leaking oil filter Excessive engine vibrations H3the Potential Damage Caused By Oil Leaks/h3 Ignoring an oil leak can lead to severe damage, affecting various components of your vehicle. The potential damage caused by oil leaks includes: Reduced lubrication: Lack of proper lubrication can cause friction and excessive heat, leading to engine wear and potential failure. Engine damage: If oil is leaking into the combustion chamber, it can result in fouled spark plugs, reduced engine performance, and even engine misfires. Environmental impact: Oil leaks can contaminate the surrounding environment, harming plants, animals, and polluting water sources. H3factors That Influence The Cost Of Repairs/h3 The cost of repairing an oil leak can vary depending on several factors. Some key factors that influence the cost of repairs include: The severity and location of the leak The type of vehicle and its specific components The cost and availability of replacement parts The labor and expertise required for repair H3the Importance Of Timely Repairs/h3 Timely repairs are crucial in preventing further damage and increased costs associated with oil leaks. Ignoring an oil leak can lead to more significant issues, affecting the engine’s overall performance and longevity. It is advisable to address oil leaks as soon as they are detected to minimize potential damage and avoid expensive repairs in the future. Diagnostic Process And Costs An oil leak can be a nuisance for any vehicle owner, not to mention the potential damage it can cause if left untreated. When it comes to repairing an oil leak, the first step is to identify the source of the leak through a diagnostic process. This involves a thorough examination of the vehicle’s components and systems to pinpoint the exact location of the leak. In this article, we will explore the importance of identifying the source of the oil leak, the diagnostic procedures used by professionals, and the associated costs. Importance Of Identifying The Source Of The Leak Identifying the source of an oil leak is crucial for several reasons. First and foremost, it allows for an accurate estimation of the repair costs. Different components of a vehicle’s engine or transmission may require varying degrees of repair or replacement, which can greatly impact the overall cost. By identifying the exact source of the leak, technicians can provide an informed diagnosis and recommend the necessary repairs. Additionally, knowing the source of the leak allows for a targeted and efficient repair process, minimizing the downtime of the vehicle and reducing the risk of further damage. Diagnostic Procedures Used By Professionals Professionals employ a range of diagnostic procedures to identify the source of an oil leak. These procedures may vary depending on the make and model of the vehicle, as well as the specific symptoms observed. However, there are several common techniques used by most professionals, including: Visual inspection: Technicians visually examine the engine and transmission components for any signs of leakage, such as oil stains or wet spots. Pressure testing: This involves applying pressure to the engine or transmission system to detect any leaks. Pressure tests can be conducted using specialized equipment to identify even the tiniest leaks. Dye testing: Technicians may add a fluorescent dye to the oil system, which will help them identify the source of the leak using UV light. This method is especially useful for detecting leaks from hard-to-reach areas. Oil analysis: In some cases, oil samples may be sent to a laboratory for analysis. This process can help identify any contaminants or abnormal wear patterns that may suggest the source of the leak. The Cost Of Diagnostics The cost of diagnosing an oil leak can vary depending on several factors, including the complexity of the leak, the make and model of the vehicle, and the rates charged by the service provider. Generally, diagnostic costs can range from $50 to $200 or more. It’s important to remember that the diagnostic cost is separate from the actual repair cost, as it only covers the analysis and identification of the problem. However, investing in a thorough diagnostic process can save you money in the long run by preventing further damage and ensuring the proper repairs are carried out. Summary Identifying the source of an oil leak is crucial for estimating repair costs accurately and ensuring an efficient repair process. Professionals employ various diagnostic procedures, including visual inspections, pressure testing, dye testing, and oil analysis. The cost of diagnostics can range from $50 to $200 or more, depending on the complexity of the leak and

How Much Does an Oil Leak Cost to Repair? Uncover the Financial Impact Now! Read More »

How to Get Rid of Burning Oil Smell in Car

How to Banish Burning Oil Smell in Your Car: Proven Methods

To get rid of the burning oil smell in your car, clean the affected area thoroughly and check for any oil leaks or spills that need to be addressed. Additionally, use odor-neutralizing products specifically designed for cars to eliminate the unpleasant smell. Proper maintenance and regular inspection of your vehicle can help prevent oil-related issues and keep your car smelling fresh. Identify The Source Of The Smell If you are experiencing a burning oil smell in your car, it is crucial to identify the source of the odor as soon as possible. Ignoring this issue can lead to major engine problems and potential breakdowns. In order to remedy the situation, you need to inspect different areas of your vehicle that may be responsible for the smell. This section will guide you through the necessary steps to identify the source of the burning oil smell. Check For Any Visible Oil Leaks One of the first things you should do is to check for any visible oil leaks under your car. Park your vehicle on a clean surface and examine the ground beneath it. Look for any dark or discolored patches that might indicate oil leakage. Oil leaks can occur due to damaged seals, gaskets, or engine components. If you notice an oil leak, it is crucial to have it repaired immediately to prevent further damage to your engine. Inspect The Engine For Signs Of Oil Spillage The next step is to carefully inspect the engine for signs of oil spillage. Open the hood and visually examine the engine components. Look for any pools or stains of oil, especially around the oil filler cap, dipstick, and valve covers. These can be indications of a loose or damaged component that is causing oil to leak or spill out. If you notice any oil spillage, it is important to address the issue promptly to prevent engine overheating and potential engine failure. Examine The Exhaust System For Oil Deposits Finally, you should examine the exhaust system for any oil deposits. Start by looking at the tailpipe and see if you notice any black, oily residue. This can occur when oil is burning in the exhaust system due to leaks or engine problems. Additionally, check for any excessive smoke coming from the tailpipe, as it could be a sign of burning oil. If you find oil deposits or excessive smoke, it is advisable to consult a mechanic to diagnose and repair the underlying issue. Clean And Treat Oil Spills To get rid of the burning oil smell in your car, follow these steps for a clean and treated oil spill. Remove any visible oil, use an absorbent material, clean the affected area thoroughly, and apply an odor-neutralizing product. Regular maintenance can help prevent future spills and smells. Safely Remove Any Oil Spills Using Absorbent Materials If you’ve encountered an oil spill in your car, it’s important to address it promptly and safely to prevent further damage and eliminate the burning oil smell. One effective method to clean and treat oil spills is by using absorbent materials. These materials can quickly soak up the spilled oil, making it easier to remove and minimize the lingering smell. Here are some steps to safely remove oil spills: Step 1: Wear protective gloves to avoid direct contact with the oil spill. Step 2: Prepare a container with absorbent materials such as cat litter, baking soda, or sawdust. Place the materials directly onto the affected area, covering the entire spill. Step 3: Apply gentle pressure to the absorbent materials to encourage absorption. Allow the materials to sit on the spill for a few minutes, absorbing as much oil as possible. Step 4: Once the absorbent materials have soaked up the oil, use a broom or brush to sweep them away. Dispose of the materials properly in a sealed container or bag, following local regulations for hazardous waste disposal. Step 5: Repeat the process if any traces of the oil spill or smell remain. This method is a quick and effective way to handle smaller oil spills in your car. However, for larger or more stubborn spills, additional steps may be necessary to completely eliminate the burning oil smell. Apply A Degreaser To The Affected Areas To thoroughly clean and treat oil spills in your car, it’s essential to apply a degreaser to the affected areas. A degreaser is a powerful cleaning agent specifically designed to break down grease and oil. Follow these steps to effectively use a degreaser: Step 1: Purchase a suitable degreaser from an automotive store or online. Read the instructions and safety guidelines provided by the manufacturer before use. Step 2: Ensure the area is well-ventilated by opening doors or windows. This prevents the buildup of fumes and allows for a better cleaning experience. Step 3: Apply the degreaser generously to the affected areas, focusing on the spots with the strongest oil smell. Use a sponge or soft cloth to spread the degreaser evenly. Step 4: Allow the degreaser to penetrate the oil stains for the recommended amount of time specified by the manufacturer. This typically ranges from a few minutes to several hours, depending on the severity of the oil spill. Step 5: After the specified time has passed, use a clean cloth or sponge to wipe away the degreaser and the dissolved oil. Rinse the cloth or sponge frequently to prevent reapplying the oil onto the surface. Step 6: Repeat the process if necessary until the oil smell has been completely eliminated. Applying a degreaser can effectively break down and remove stubborn oil stains, ensuring that your car smells fresh and clean once again. Use A Steam Cleaner To Deep Clean Surfaces When it comes to deep cleaning surfaces affected by oil spills, using a steam cleaner can be highly effective. The high-temperature steam produced by this cleaning device can thoroughly remove oil residue and eradicate any lingering smell. Follow these steps to use a steam cleaner: Step 1: Read the manufacturer’s instructions to familiarize

How to Banish Burning Oil Smell in Your Car: Proven Methods Read More »

How to Build Oil Pressure Without Running an Engine

How to Effortlessly Create Oil Pressure Without Running an Engine

To build oil pressure without running an engine, you can use a priming tool to manually pump oil into the oil system. Building oil pressure without running an engine is essential when you are performing maintenance or repairs that require oil pressure, such as installing a new oil pump or replacing the oil filter. By following the steps outlined below, you can safely and effectively build oil pressure in your engine without actually starting it. This process will ensure that your engine’s internal components receive sufficient lubrication before running the engine, preventing potential damage and ensuring optimal performance. We will guide you through the necessary steps to build oil pressure without running an engine to help you maintain your vehicle’s longevity and reliability. Understanding The Basics Of Oil Pressure Oil pressure is essential for the proper functioning of an engine, but it can be built without actually running the engine. By following a series of steps, you can generate oil pressure in a safe and effective manner. Understanding these basics is crucial for the maintenance and care of your engine. Oil pressure is a vital aspect of engine operation as it ensures the smooth and efficient functioning of various components. Whether you’re a seasoned mechanic or a car enthusiast wanting to learn more about your vehicle’s oil pressure, understanding the basics is essential. In this section, we will delve into the importance of oil pressure in the engine and explore the components involved in oil pressure generation. Importance Of Oil Pressure In The Engine Oil pressure plays a crucial role in lubricating the engine’s moving parts and preventing excessive wear and tear. It ensures proper circulation of oil, allowing components to glide smoothly and reducing frictional forces. By maintaining sufficient oil pressure, the engine’s vital parts are protected from damage caused by metal-to-metal contact. Additionally, the oil pressure ensures effective cooling as it carries away heat generated during engine operation. Therefore, maintaining optimal oil pressure is vital for the longevity and performance of your engine. Components Involved In Oil Pressure Generation Several components are responsible for generating and regulating oil pressure in an engine. Let’s take a closer look at these components: Oil Pump: The oil pump is the heart of the oil pressure generation system. It is typically driven by the engine’s crankshaft or camshaft and is responsible for pulling oil from the oil pan and delivering it to various parts of the engine. The pump’s gears or rotors create suction, drawing oil from the pan and pressurizing it before sending it through the engine’s passages. Oil Filter: The oil filter plays a vital role in maintaining oil pressure by removing contaminants and debris from the oil. It prevents these particles from clogging the oil passages and ensures the smooth flow of oil to critical engine components. Regularly replacing the oil filter is crucial to maintain optimal oil pressure. Oil Passages: The engine is equipped with a network of channels and passages that allow the oil to reach different parts efficiently. These passages direct the pressurized oil to the crankshaft, camshaft, bearings, and other vital components, ensuring proper lubrication and cooling. Oil Pressure Relief Valve: To prevent excessive oil pressure buildup, engines are equipped with an oil pressure relief valve. This valve is designed to open and release oil back into the oil pan when oil pressure exceeds a certain threshold. By regulating the pressure, it prevents damage to the engine and maintains a consistent oil pressure level. Understanding the importance of oil pressure and the components involved in its generation is vital for any car owner or enthusiast. It allows you to make informed decisions regarding maintenance and troubleshooting, ensuring your engine remains in optimal condition. Now that we have explored the basics of oil pressure, let’s move on to the fascinating process of building oil pressure without running an engine. Creating Oil Pressure Without Running An Engine The Need For Oil Pressure Without Engine Running Oil pressure plays a crucial role in ensuring the smooth functioning of an engine. Without adequate oil pressure, engine components can experience excessive wear and tear, leading to costly repairs and potential damage. In certain situations, it may be necessary to generate oil pressure without running the engine. This could be when performing maintenance or diagnostic procedures, testing oil pressure sensors, or priming the engine after an oil change. In this article, we will explore effective methods to generate oil pressure without running the engine. Methods To Generate Oil Pressure Without Running The Engine Method 1: Using an Electric Drill and Oil Priming Tool One way to create oil pressure without running the engine is by using an electric drill and an oil priming tool. Here’s how: Attach the oil priming tool to the oil pump’s drive shaft, ensuring a secure connection. Insert the oil priming tool into the engine’s oil pump inlet or oil filter housing, depending on the specific setup. Power the electric drill and slowly rotate the oil pump, simulating the engine’s rotation. This process allows the oil to circulate, generating oil pressure within the system. If an electric drill is not available, an alternative method is using a vacuum pump. The steps below outline how to generate oil pressure using this method: Identify the oil pressure sensor or sending unit on the engine. Disconnect the sensor or sending unit. Connect the vacuum pump to the port where the sensor or sending unit was disconnected. Begin operating the vacuum pump, creating a vacuum within the oil system. As the vacuum is applied, oil will be drawn into the system and oil pressure will start to build. In some cases, a pre-lube tank can be utilized to generate oil pressure without running the engine. This method involves the following steps: Fill the pre-lube tank with the appropriate engine oil. Connect the pre-lube tank to the oil pump inlet or oil filter housing. Activate the pump in the pre-lube tank, pressurizing the oil system. This pressurized oil will circulate through

How to Effortlessly Create Oil Pressure Without Running an Engine Read More »

When To Do a First Oil Change for a New Car: Expert Tips & Insights

The first oil change for a new car should typically be done at around 3,000 miles or as recommended by the manufacturer. Introducing regular maintenance for your new car is essential to keep it running smoothly and to extend its lifespan. One crucial aspect of maintenance is changing the oil regularly. While oil change intervals may vary depending on the make and model, as a general rule of thumb, it is recommended to do the first oil change for a new car at around 3,000 miles or as advised by the manufacturer. This initial oil change helps remove any metal shavings or impurities that may be present in the engine due to its break-in period. Regularly changing the oil ensures proper lubrication, reduces wear and tear, and improves the overall performance and longevity of your new car. Common Misconceptions About Oil Changes For New Cars When it comes to maintaining a new car, one of the most debated topics is when to do the first oil change. There are several misconceptions surrounding this topic, which can lead to confusion among car owners. In this section, we will debunk these myths and shed light on the importance of the first oil change for a new car. The Importance Of The First Oil Change For A New Car Many car owners mistakenly believe that the first oil change for a new car is not necessary because the engine is still in its break-in period. However, this misconception can have detrimental effects on the longevity and performance of your vehicle. The truth is, an oil change is crucial for a new car to ensure that the engine is properly lubricated and protected. During the manufacturing process, tiny metal shavings, rust, and other contaminants can find their way into the engine. These impurities can mix with the oil and cause friction, leading to premature wear and tear. Additionally, the initial oil that comes with a new car is often of lower quality, designed to protect the engine during the transit and storage period. Therefore, it is essential to replace this oil with a higher-quality lubricant as soon as possible. Another misconception is that a new car can go a long time without an oil change. While newer cars generally have longer oil change intervals compared to older models, it is still crucial to follow the manufacturer’s recommendations for the first oil change. This initial change helps flush out any manufacturing debris or contaminants, ensuring optimal performance and extending the life of your car’s engine. Debunking Myths About When To Do The First Oil Change One common myth is that a new car does not require an oil change until a specified mileage, such as 5,000 or 10,000 miles. However, it is essential to note that these mileage intervals are often the maximum recommended intervals, assuming ideal driving conditions. In reality, your driving habits and the type of driving you do can impact the timing of your first oil change. For instance, if you frequently drive in stop-and-go traffic or harsh weather conditions, your engine may be subjected to more stress and contaminants. In such cases, it is advisable to have the first oil change performed earlier, usually between 1,000 to 3,000 miles. This ensures that any potential contaminants are flushed out before they can cause significant damage. On the other hand, if your driving primarily consists of highway miles and you adhere to regular maintenance schedules, it may be safe to wait until the manufacturer’s recommended interval. However, it is always best to consult your car’s owner manual or contact the manufacturer for specific guidelines. Understanding The Manufacturer’s Recommendations And Guidelines When it comes to oil changes for new cars, it is crucial to adhere to the manufacturer’s recommendations and guidelines. They have extensive knowledge of the vehicle and have conducted thorough tests to determine the appropriate oil change intervals. Manufacturer’s Recommended Interval: Driving Conditions: 5,000-7,500 miles Normal driving conditions, regular maintenance adherence 3,000-5,000 miles Severe driving conditions (e.g., stop-and-go traffic, extreme temperatures) By understanding these time frames and factors, you can make an informed decision about when to do the first oil change for your new car. Remember, regular oil changes are vital for maintaining the overall health and performance of your vehicle, so it is crucial not to overlook this essential maintenance task. Factors That Determine The Timing Of The First Oil Change The timing of the first oil change for a new car depends on several factors, including the manufacturer’s recommendations, type of oil used, and driving conditions. Following the right schedule can help maintain optimal engine performance and prolong the life of your vehicle. The Break-in Period And Its Impact On Oil Change Intervals During the break-in period of a new car, the engine components gradually settle into their optimal positions, ensuring smooth operation and maximum performance. This phase is crucial for the longevity of your vehicle and also affects the timing of the first oil change. Manufacturers often recommend changing the oil after a specific mileage or duration to coincide with the completion of the break-in period. It is important to follow the manufacturer’s guidelines regarding the break-in period and the first oil change. These guidelines will vary depending on the make and model of your car. By adhering to these recommendations, you can help promote optimal engine performance and protect your investment. How Driving Conditions Can Affect The Timing Of The First Oil Change The conditions in which you drive your new car can significantly impact the timing of the first oil change. Factors such as extreme temperatures, frequent stop-and-go driving, towing heavy loads, or driving in dusty or off-road environments can accelerate the rate at which the oil deteriorates. In such cases, the manufacturer may suggest changing the oil more frequently to prevent potential damage caused by degraded oil. Additionally, driving in severe conditions may trigger the engine’s oil life monitoring system, if equipped, to alert you to change the oil earlier than the pre-determined interval.

When To Do a First Oil Change for a New Car: Expert Tips & Insights Read More »

Which Engine Oil is Best for Honda Accord

Which Engine Oil is Best for Honda Accord : Unveiling the Ultimate Power Boost!

The best engine oil for the Honda Accord is Honda Genuine Fluid 08798-9036 0W-20 Full Synthetic Blend Motor Oil. It provides superior lubrication, helps improve engine performance, and prolongs engine life. When choosing engine oil for your Honda Accord, it is important to consider the manufacturer’s recommendations in order to ensure optimal performance and functionality. Engine oils that meet Honda’s specifications and are specifically designed for Honda engines, such as the Honda Genuine Fluid 08798-9036, are recommended for the best results. By using the right engine oil, you can enhance the overall performance and longevity of your Honda Accord. Maximizing Performance And Power Efficiency Maximize your Honda Accord’s performance and power efficiency with the ideal engine oil. Find the best oil that suits your Accord’s needs for optimal results. Understand The Impact Of Engine Oil On Overall Performance When it comes to maximizing the performance and power efficiency of your Honda Accord, your choice of engine oil plays a significant role. The engine oil you use affects not only the smooth running and longevity of your engine but also its overall performance and power output. An engine oil optimally designed for your Honda Accord helps reduce internal friction, which in turn improves the engine’s efficiency and power output. It also assists in controlling the temperature of the engine, ensuring proper lubrication, and preventing wear and tear of engine components. Understanding how engine oil impacts your vehicle’s performance is crucial when selecting the appropriate oil to keep your Honda Accord running at its best. Choosing The Right Oil To Unleash The True Power Of Your Honda Accord Unleashing the true power of your Honda Accord involves selecting the right engine oil specifically formulated for your vehicle’s needs. With a multitude of options available, it’s essential to choose an oil that meets Honda’s specifications and requirements. To ensure maximum performance, you must consider factors such as the oil’s viscosity, quality, and compatibility with your Honda Accord’s engine type. The recommended engine oil for optimum performance is typically a high-quality synthetic oil, which offers superior protection against engine wear and a longer service life. By investing in the right engine oil, you can experience enhanced power delivery, fuel efficiency, and overall responsiveness, allowing you to harness the true potential of your Honda Accord. Factors To Consider When Selecting Engine Oil For Optimal Performance Selecting the best engine oil for your Honda Accord requires careful consideration of several important factors. Here are the key criteria to keep in mind: Viscosity: Consider the specific viscosity grade recommended by Honda for your Accord model. Viscosity determines the oil’s thickness and its ability to flow smoothly within the engine, providing adequate lubrication. API Rating: Look for the American Petroleum Institute (API) rating of the oil, which indicates its quality and performance. The higher the rating, the better the oil’s ability to protect and clean your engine. Oil Additives: Check whether the oil contains additives that offer additional benefits, such as improved fuel economy, reduced engine wear, and better protection against sludge formation. Manufacturer Recommendations: Always refer to Honda’s official recommendations and specifications for engine oil. These guidelines provide valuable insights into the ideal oil type, grade, and formulation for your specific Honda Accord model. Climate and Driving Conditions: Take into account the climate and driving conditions in your area. If you frequently drive in extreme temperatures or engage in heavy-duty driving activities, you may need an oil with enhanced thermal stability and higher performance ratings. By carefully considering these factors, you can select the engine oil that will optimize the performance and power efficiency of your Honda Accord, ensuring a smoother, more enjoyable driving experience. Achieving Optimal Fuel Efficiency The engine oil you choose for your Honda Accord plays a significant role in determining its fuel efficiency. By selecting the right engine oil, you can enhance your vehicle’s mileage and contribute to a greener environment. In this article, we will explore the role of engine oil in improving fuel economy, the importance of selecting the right viscosity grade, and how synthetic oils can significantly boost your Honda Accord’s mileage. The Role Of Engine Oil In Improving Fuel Economy Engine oil not only lubricates the various components of your Honda Accord’s engine, but it also plays a vital role in improving fuel efficiency. The right engine oil reduces friction between moving parts, ensuring smooth operation and minimizing energy losses. Besides lubrication, engine oil also helps to cool down crucial engine components by absorbing heat. This temperature regulation prevents engine overheating and reduces fuel consumption. Moreover, high-quality engine oils are formulated to resist oxidation and deposit formation, maintaining engine cleanliness. A clean engine is more efficient, leading to better fuel economy. Selecting The Right Viscosity Grade For Enhanced Fuel Efficiency When it comes to achieving optimal fuel efficiency, selecting the right viscosity grade of engine oil is crucial. Viscosity refers to an oil’s resistance to flow at different temperatures. It directly impacts how the oil circulates and lubricates various engine parts. For your Honda Accord, it is recommended to refer to the manufacturer’s specifications to identify the appropriate viscosity grade. Generally, a lower viscosity grade, such as 0W-20, is preferred for improved fuel efficiency. This thinner oil flows more easily, reducing friction and energy losses within the engine, ultimately resulting in better mileage. On the other hand, using an oil with a higher viscosity grade, such as 10W-30, might be suitable for older Honda Accord models or specific driving conditions. However, bear in mind that higher viscosity oils tend to create more drag and resistance, leading to reduced fuel efficiency. How Synthetic Oils Contribute To Better Mileage Synthetic oils are highly recommended for Honda Accord owners who prioritize fuel efficiency. Synthetic oils are formulated using advanced chemical compounds that provide superior lubrication and stability compared to conventional oils. Due to their refined composition, synthetic oils have a more consistent viscosity across a wide range of temperatures. This characteristic ensures seamless lubrication during both cold starts and when the

Which Engine Oil is Best for Honda Accord : Unveiling the Ultimate Power Boost! Read More »