carinsiderhub.com

Car Brand

Stop Start System Fault Nissan Qashqai Causes & Fix

Stop Start System Fault: Causes & Fix for Nissan Qashqai

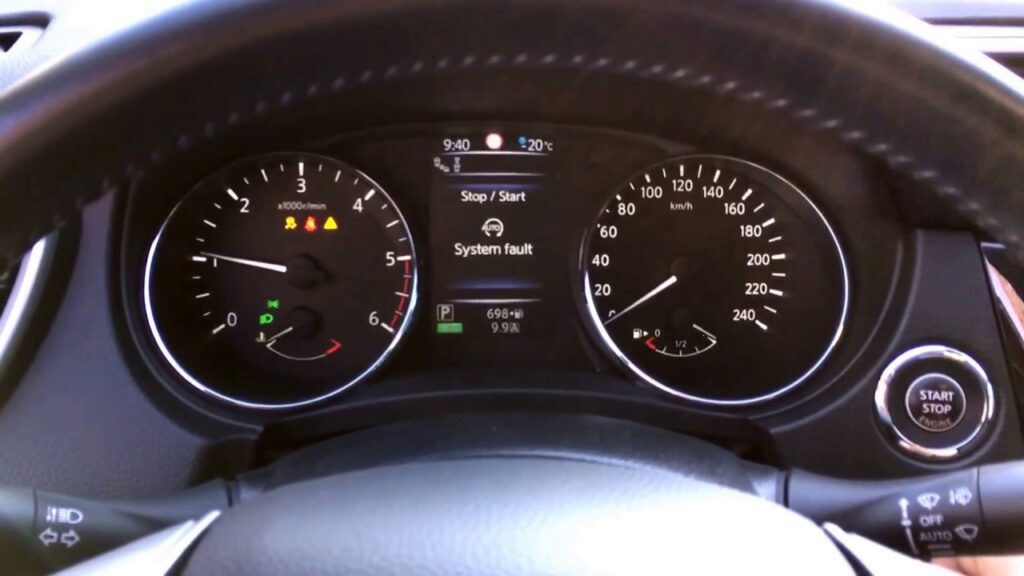
The causes and fix for a Stop Start System Fault in a Nissan Qashqai are explained concisely in the following two sentences. The Stop Start System Fault in a Nissan Qashqai can be caused by a faulty battery or a malfunctioning control module. The fix involves replacing the battery or repairing the control module. The Stop Start System in a Nissan Qashqai is designed to automatically turn off the engine when the vehicle is stationary, and then restart it when the driver wants to move again. However, if you are experiencing a Stop Start System Fault, where the system is not functioning properly, it can be frustrating and affect the overall performance of your vehicle. We will explore the possible causes and solutions for a Stop Start System Fault in a Nissan Qashqai, helping you understand what might be happening and how to address the issue effectively. What Is The Stop Start System And How Does It Work? The Stop Start system is a feature in Nissan Qashqai that automatically shuts off the engine when the vehicle is stationary to save fuel and reduce emissions. Common faults with this system can include a malfunctioning battery, faulty sensors, or issues with the engine control unit. These faults can be fixed by replacing the battery, recalibrating the sensors, or updating the software. Brief Overview Of The Stop Start System The Stop Start system, also known as the idle stop system or the start-stop system, is an innovative technology designed to improve fuel efficiency and reduce emissions in vehicles. This system automatically shuts off the engine when the vehicle is at a standstill, such as at traffic lights or in heavy traffic, and then restarts it when the driver releases the brake pedal or engages the clutch. By eliminating unnecessary idling, the Stop Start system helps drivers save fuel and reduces their carbon footprint. Explanation Of How The System Works In Nissan Qashqai The Stop Start system in the Nissan Qashqai operates in a seamless and efficient manner. Once the vehicle comes to a complete stop and the driver releases the brake pedal, the system detects the momentary stop and initiates the engine shutdown. This is done by temporarily cutting off the fuel supply and halting the combustion process. While the engine is off, the Nissan Qashqai’s electrical systems remain operational, ensuring that essential features such as air conditioning, infotainment, and safety systems continue to function. When the driver is ready to resume driving, whether by pressing the accelerator pedal or engaging the clutch, the system quickly and smoothly restarts the engine. This process occurs in mere milliseconds, ensuring a seamless transition from stationary to movi Credit: www.reddit.com Common Causes Of Stop Start System Fault When it comes to the Stop Start system in your Nissan Qashqai, there can be a few potential causes for a system fault. In this article, we will discuss some of the common issues that can lead to a malfunction in the Stop Start system. By understanding these causes, it will be easier to diagnose and solve the problem, getting your vehicle back on the road in no time. Faulty Battery Or Battery Sensor One of the most common causes of a Stop Start system fault is a faulty battery or battery sensor. The Stop Start system relies heavily on the battery’s power and health to function properly. If the battery is weak or has a bad connection, it can prevent the system from starting or stopping the engine as intended. Additionally, a malfunctioning battery sensor may provide inaccurate information to the system, leading to a fault. Checking the battery’s condition and connections, as well as the battery sensor, is a good starting point when troubleshooting a Stop Start system issue. Malfunctioning Starter Motor Or Alternator A malfunctioning starter motor or alternator can also cause a fault in the Stop Start system. The starter motor is responsible for initiating the engine startup, while the alternator recharges the battery and powers the vehicle’s electrical systems. If either component is not functioning properly, it can lead to issues with the Stop Start system. A starter motor that fails to engage or an alternator that does not provide sufficient power can result in the system’s failure to start or stop the engine efficiently. Checking the starter motor and alternator for any signs of malfunction is crucial when troubleshooting a Stop Start system fault. Issues With The Ignition System The ignition system plays a vital role in the overall operation of the Stop Start system. If there are any issues with the ignition system, such as a faulty ignition switch or a problematic ignition coil, it can cause the Stop Start system to malfunction. A faulty ignition switch may prevent the engine from starting or stopping when required, while a malfunctioning ignition coil can disrupt the engine’s performance and affect the system’s operation. Therefore, inspecting the ignition system for any potential problems can help identify the cause of a Stop Start system fault. Sensor Or Software Problems Finally, sensor or software problems can contribute to a Stop Start system fault. The system relies on various sensors, such as the engine temperature sensor and the brake pedal position sensor, to monitor the vehicle’s conditions and trigger engine startup or shutdown. If any of these sensors are faulty or providing incorrect readings, it can lead to a system malfunction. Additionally, software glitches or outdated software versions can also disrupt the system’s normal operation. Ensuring that all sensors are functioning correctly and that the system software is up to date is crucial to resolving Stop Start system faults. Signs And Symptoms Of A Stop Start System Fault Signs and Symptoms of a Stop Start System Fault A faulty stop-start system in your Nissan Qashqai can be frustrating and may indicate an underlying issue with the vehicle. It is important to identify the signs and symptoms of a stop-start system fault to address the problem promptly. In this section, we will discuss the common indications

Stop Start System Fault: Causes & Fix for Nissan Qashqai Read More »

How to Fix Audi Glow Plug Light Flashing

How to Fix Audi Glow Plug Light Flashing: Quick and Easy Solutions

To fix the Audi glow plug light flashing, start by checking the glow plugs and the wiring connected to them, and replace any faulty parts accordingly. Then, clear any fault codes using a diagnostic tool and reboot the engine management system. Glow plug issues can be a cause for concern in an Audi, especially when the glow plug light starts flashing. This warning light indicates a problem with the glow plugs or the associated wiring. Ignoring or neglecting this issue can lead to difficulties in starting the engine or even engine damage. However, with proper troubleshooting and necessary repairs, you can resolve the flashing glow plug light issue and ensure optimal functionality of your Audi. In the following sections, we will explore the steps to fix this problem and get your Audi back on track. Credit: www.slideshare.net Understanding The Glow Plug System The Audi glow plug light flashing issue can be resolved with a clear understanding of the glow plug system. Learn how to fix it effectively and quickly. What Are Glow Plugs And Their Purpose? Glow plugs play a vital role in the ignition system of diesel engines. Unlike spark plugs used in gasoline engines, glow plugs in Audi vehicles are designed to heat the combustion chamber before starting the engine. They serve the purpose of preheating the air in the cylinders, ensuring efficient combustion and smooth engine startup even in cold weather conditions. How Does The Glow Plug System Work In An Audi? Audi vehicles are equipped with a glow plug system that consists of several essential components. When you turn the ignition key or press the start button, the glow plug control module receives a signal and starts the preheating process. The control module then activates the glow plug relay, which provides power to the glow plugs. Note: The glow plug system in Audi vehicles often includes multiple glow plugs, typically one for each cylinder, although the exact number may vary depending on the engine model. Once power is supplied, the glow plugs rapidly heat up using electrical energy. The heated glow plugs then transfer this heat to the air in the cylinders, raising its temperature. This preheated air helps to vaporize the injected diesel fuel, promoting efficient combustion when the engine is cranked. Common Symptoms Of Glow Plug Issues If there are any problems with the glow plug system in your Audi, several noticeable symptoms may arise. It is essential to be aware of these signs to address the issue promptly: Difficult cold starts: One of the most common symptoms of malfunctioning glow plugs is difficulty starting the engine, especially in cold conditions. When the glow plugs fail to heat the air adequately, the engine may struggle to ignite the fuel, resulting in prolonged cranking or even failure to start. Flashing glow plug light: Another telltale sign of glow plug issues is a flashing glow plug light on the dashboard. The light may appear during startup or while driving and indicates a fault in the glow plug system that requires attention. Engine misfires: Faulty glow plugs can cause uneven combustion in the engine, leading to engine misfires. You may notice a lack of power, rough running, or unusual sounds from the engine. Increased fuel consumption: Inefficient combustion due to malfunctioning glow plugs can result in increased fuel consumption. If you find that your Audi is using more fuel than usual, it could be a sign of glow plug problems. If you experience any of these symptoms, it is recommended to have your Audi inspected by a qualified technician to determine and resolve the exact cause of the glow plug issue. Quick And Easy Fixes For Audi Glow Plug Light Flashing Quick and Easy Fixes for Audi Glow Plug Light Flashing Checking The Glow Plug Control Module If you notice that the glow plug light in your Audi is flashing, one possible cause could be a malfunctioning glow plug control module. To check whether the control module is the issue, follow these simple steps: Locate the glow plug control module in your Audi. It is usually positioned near the engine bay. Inspect the module for any visible signs of damage such as burned wires, loose connections, or corrosion. If you notice any issues, it is crucial to replace or repair the control module as necessary. This can be done by a professional mechanic or with the help of a diagnostic tool. Inspecting And Cleaning The Glow Plugs In some cases, a flashing glow plug light can indicate a problem with the glow plugs themselves. To inspect and clean the glow plugs, follow these steps: Locate the glow plugs, which are usually situated near the engine intake manifold. Carefully remove the connections from each glow plug. Make sure to label them to avoid confusion during reinstallation. Inspect the glow plugs for any signs of damage or wear. Look for cracks, carbon buildup, or excessive corrosion. If the glow plugs appear dirty or corroded, clean them using a suitable wire brush or a specialized cleaning solution. Ensure all debris is removed. Once cleaned, reinstall the glow plugs and reconnect the wires firmly. Testing The Glow Plug Relay The glow plug relay is responsible for providing power to the glow plugs. To test whether the relay is functioning correctly: Locate the glow plug relay, which is often found near the fuse box. Using a multimeter, set it to measure electrical resistance. Disconnect the relay and measure the resistance across the appropriate terminals. Consult your vehicle’s manual for the correct values. If the measured resistance is significantly higher or lower than the specified range, the relay may be faulty and should be replaced. Replacing Faulty Glow Plugs If none of the above fixes resolve the issue and the glow plug light continues to flash, it is likely that one or more glow plugs are faulty. Follow these steps to replace them: Isolate the faulty glow plug by disconnecting its wire and removing it using a specialized glow plug removal tool.

How to Fix Audi Glow Plug Light Flashing: Quick and Easy Solutions Read More »

Tire Pressure Monitor Problem Honda Civic

Tire Pressure Monitor Problem Honda Civic: Troubleshooting Tips and Solutions

The Honda Civic tire pressure monitor problem can be resolved by checking the tire pressure and resetting the TPMS system. We will discuss how to troubleshoot and fix the tire pressure monitor problem in your Honda Civic, ensuring a safe and smooth driving experience. We will explore the common causes of TPMS issues, the steps to check and adjust tire pressure, and the process of resetting the TPMS system. By following these steps, you will be able to address the tire pressure monitor problem in your Honda Civic effectively and prevent any potential safety hazards on the road. Common Causes Of Tire Pressure Monitor Issues Having a reliable tire pressure monitoring system is crucial for the safety and performance of your Honda Civic. However, there are several common causes that can lead to tire pressure monitor issues. Understanding these causes will help you diagnose and resolve any problems with your vehicle’s monitoring system efficiently. Faulty Sensors Faulty sensors are one of the primary reasons for tire pressure monitor issues. These sensors are responsible for detecting and transmitting tire pressure data to the system. When a sensor becomes faulty, it may provide inaccurate readings or fail to communicate with the system altogether. This can lead to false alarms or a total loss of tire pressure data. To determine if you have faulty sensors, you can use a tire pressure gauge to manually check and compare the tire pressure readings with the monitor’s display. If there is a significant difference or inconsistency between the two, it is likely that one or more sensors need to be replaced. Low Battery Voltage Low battery voltage can also cause tire pressure monitor issues in your Honda Civic. The sensors rely on adequate battery power to function correctly. If the battery voltage drops below a certain threshold, it can affect the sensors’ ability to provide accurate readings. Regularly checking your vehicle’s battery voltage and ensuring it is within the recommended range is essential. If you constantly experience tire pressure monitor issues, it might be worth considering replacing the battery to ensure optimal sensor performance. Incorrect Sensor Initialization When you replace or rotate your tires, it is essential to perform sensor initialization to ensure accurate readings. Failure to initialize the sensors can lead to incorrect tire pressure monitor readings and alerts. To initialize the sensors correctly, consult your Honda Civic’s owner’s manual for the specific procedure. By following the recommended steps, you can ensure that the sensors are properly synced with the monitoring system, minimizing the chances of encountering tire pressure monitor issues. Sensor Signal Interference Sensor signal interference is another common cause of tire pressure monitor issues. Interfering signals from other devices or equipment can disrupt the communication between the sensors and the monitoring system, leading to inaccurate readings or even a complete loss of data. To minimize signal interference, ensure that electronic devices, such as cell phones or tablets, are kept away from the sensors. Additionally, avoid parking your Honda Civic near sources of strong electromagnetic fields, such as power stations or radio towers. Tire Pressure Monitor Problem Honda Civic: Common Causes Common Causes Solution Faulty Sensors Replace faulty sensors Low Battery Voltage Ensure battery voltage is within the recommended range Incorrect Sensor Initialization Follow the vehicle’s manual for sensor initialization procedure Sensor Signal Interference Avoid electronic devices and strong electromagnetic fields By understanding and addressing these common causes of tire pressure monitor issues in your Honda Civic, you can maintain a reliable and accurate monitoring system. Regularly checking and maintaining your sensors, battery voltage, and performing correct sensor initialization will ensure that your tire pressure monitor functions effectively, enhancing your overall driving experience. Signs And Symptoms Of A Tire Pressure Monitor Problem Proper tire pressure is essential for safe and efficient driving. That’s why modern vehicles, like the Honda Civic, come equipped with a Tire Pressure Monitoring System (TPMS) to alert drivers of any tire pressure abnormalities. However, like any technology, the TPMS can experience problems from time to time. Being aware of the signs and symptoms of a tire pressure monitor problem can help you address the issue promptly and ensure your vehicle’s safety on the road. Warning Light Illumination The first sign of a tire pressure monitor problem is often the illumination of a warning light on your Honda Civic’s dashboard. The TPMS warning light, typically shaped like an exclamation point inside a tire, will illuminate to indicate that there is an issue with your tire pressure. This warning light is your vehicle’s way of informing you that one or more of your tires may be underinflated. It is crucial to pay attention to this warning and address the issue promptly to avoid potential tire damage or loss of control while driving. Inconsistent Or Erratic Pressure Readings Another sign of a tire pressure monitor problem is inconsistent or erratic pressure readings. When the TPMS is functioning correctly, it continually monitors the pressure in your tires and provides accurate readings. However, if you notice that the pressure readings on your vehicle’s display are fluctuating or showing inconsistent values, it may indicate a problem with the TPMS sensors or the system itself. Inaccurate pressure readings can lead to improper tire inflation, compromising your vehicle’s performance and safety. Inaccurate Low Tire Pressure Alerts A properly functioning TPMS will alert you when your tire pressure drops below the recommended threshold. However, if you receive frequent low tire pressure alerts despite confirming that your tires are properly inflated, it could be a sign of a TPMS problem. Inaccurate low tire pressure alerts may be caused by faulty sensors or a malfunction in the TPMS system. It’s crucial to have your TPMS inspected and repaired if you consistently receive incorrect low tire pressure alerts to ensure accurate monitoring and optimal tire performance. System Malfunction Messages In more severe cases of a tire pressure monitor problem, your Honda Civic’s display may show system malfunction messages. These messages are typically accompanied by an error code or a specific warning

Tire Pressure Monitor Problem Honda Civic: Troubleshooting Tips and Solutions Read More »

Service 4Wd Jeep Grand Cherokee

Service 4Wd Jeep Grand Cherokee: Unlock the Power Within

Need service for your Jeep Grand Cherokee’s 4WD? Look no further. Unleashing The Performance The Jeep Grand Cherokee is renowned for its power, performance, and off-road capabilities. If you own a 4Wd Jeep Grand Cherokee, you already know the thrill of conquering challenging terrains and cruising through rugged landscapes. But what if there was a way to unleash even more power and agility from your Jeep? In this section, we will explore how you can maximize the performance of your 4Wd Jeep Grand Cherokee, upgrade its components for better performance, and enhance its power and agility. Maximize The Performance Of Your 4wd Jeep Grand Cherokee When it comes to your Jeep Grand Cherokee’s performance, every detail matters. From the engine to the suspension, ensuring that each component is in top shape is essential to experiencing peak performance. Regular maintenance and servicing play a crucial role in maximizing your Jeep’s performance. Regularly change the oil: Clean and fresh oil lubricates the engine, reducing friction and wear on its moving parts. It is recommended to follow the manufacturer’s guidelines for oil change intervals. Check the air filter: A clogged air filter restricts airflow to the engine, reducing its performance. Regularly inspect and clean or replace the air filter to maintain optimal filtration. Inspect the tires: Properly inflated tires with good tread provide better traction, enhancing your Jeep’s performance both on and off-road. Check the tire pressure and condition regularly. Inspect the brakes: Faulty brakes can compromise safety and performance. Regularly check the brake pads, rotors, and fluid levels to ensure optimal braking performance. Ensure proper wheel alignment: Wheel misalignment can negatively affect your Jeep’s handling and stability. Aligning the wheels regularly can optimize performance and extend tire life. Upgrading The Components For Better Performance If you’re a Jeep enthusiast looking to take your 4Wd Grand Cherokee’s performance to the next level, upgrading certain components can make a significant difference. Here are some key components that you can consider upgrading: Component Upgrade Option Exhaust System A high-performance exhaust system can improve power and enhance the Jeep’s distinctive engine sound. Suspension Upgrading to a quality suspension system can enhance off-road capabilities and provide a smoother ride. Tires Investing in all-terrain or mud-terrain tires can improve traction and allow for better performance in challenging terrains. Battery Opting for a high-performance battery can ensure a consistent power supply to support various electrical components. Upgrading these components can offer noticeable improvements in your Jeep’s performance, making it even more capable and enjoyable during your off-road adventures. Enhancing The Power And Agility Of Your Jeep Enhancing the power and agility of your 4Wd Jeep Grand Cherokee requires specialized modifications. Professional aftermarket services can provide several options to boost your Jeep’s performance. Here are some popular enhancements: Engine Tuning: Custom tuning can optimize engine performance, increasing horsepower and torque. Cold Air Intake: Upgrading to a cold air intake system can improve airflow and increase horsepower. Performance Chip: Installing a performance chip can optimize fuel and ignition settings, maximizing power and efficiency. Upgraded Suspension: A performance suspension kit can enhance stability, improve handling, and allow for increased ground clearance. Exhaust Upgrade: Swapping the exhaust system can reduce restrictions, improve engine efficiency, and enhance the Jeep’s overall performance. By considering these enhancements and working with experienced professionals, you can unlock the true potential of your 4Wd Jeep Grand Cherokee, gaining power, agility, and an exhilarating driving experience both on and off the road. Maintenance Tips For Optimal Performance For optimal performance of your 4WD Jeep Grand Cherokee, follow these maintenance tips to keep your vehicle running smoothly. Regularly check and change fluids, inspect tires for wear, and maintain the proper alignment for a safe and reliable ride. Maintenance Tips for Optimal Performance When it comes to keeping your 4WD Jeep Grand Cherokee running smoothly, regular maintenance is crucial. Not only does it ensure optimal performance, but it also helps extend the lifespan of your vehicle. In order to give you a comprehensive guide to maintaining your Jeep, we have compiled a checklist of essential maintenance tasks. By adhering to these tips, you can keep your Jeep running like new for years to come. Importance Of Regular Service For Your 4wd Jeep Grand Cherokee Regular service is essential for the optimal performance of your 4WD Jeep Grand Cherokee. By servicing your vehicle at regular intervals, you ensure that all components are functioning properly and are in good condition. This not only helps prevent any major breakdowns but also enhances the longevity of your Jeep. Regular servicing also includes checking and replacing fluids, inspecting the brakes, and addressing any potential issues. By treating your Jeep to regular service, you can keep it running smoothly on any terrain. Essential Maintenance Checklist For Your Jeep Task Frequency Change oil and filter Every 3,000-5,000 miles or as recommended by the manufacturer Check and top-up fluids (coolant, brake fluid, power steering fluid, etc.) Every 3 months or as needed Inspect and replace air filters Every 12,000-15,000 miles or as recommended by the manufacturer Rotate tires and check tire pressure Every 6,000 miles or as recommended by the manufacturer Inspect and replace brake pads and shoes Every 25,000-50,000 miles or as needed Check and replace spark plugs Every 30,000-100,000 miles or as recommended by the manufacturer Following this checklist will help keep your Jeep in top shape and prevent any unexpected issues while on the road. By staying on top of these maintenance tasks, you can save yourself from costly repairs and ensure your Jeep is ready for any off-road adventures. How To Extend The Lifespan Of Your Jeep Wash your Jeep regularly to remove dirt, grime, and salt that can cause corrosion. Keep an eye on your Jeep’s battery and replace it when necessary. Take care of your Jeep’s exterior by applying a protective coating to prevent paint damage. Pay attention to any warning signs or unusual noises and address them promptly. Avoid harsh driving conditions, such as excessive off-roading or towing loads beyond the recommended

Service 4Wd Jeep Grand Cherokee: Unlock the Power Within Read More »

Bmw X3 Drivetrain Malfunction

Bmw X3 Drivetrain Malfunction : Troubleshoot and Resolve

The BMW X3 drivetrain malfunction refers to a problem with the vehicle’s drivetrain system. The drivetrain is responsible for transmitting power from the engine to the wheels, and a malfunction can result in various issues such as reduced performance, strange noises, and difficulty in shifting gears. It is essential to address this problem as soon as possible to prevent further damage and ensure the proper functioning of the vehicle. Routine maintenance and regular inspections can help identify and resolve any drivetrain malfunctions early on, preventing potential safety hazards and costly repairs. Understanding The Bmw X3 Drivetrain System The BMW X3 drivetrain system allows for smooth and efficient power transmission, but it is important to understand potential malfunctions to ensure optimal performance. Understanding the BMW X3 Drivetrain System The drivetrain system is a crucial component of any vehicle, including the BMW X3. It is responsible for transferring power from the engine to the wheels, enabling the car to move forward. Any malfunction in the drivetrain system can lead to poor performance, reduced fuel efficiency, and even potential safety hazards. In this section, we will explore the different aspects of the BMW X3 drivetrain system, including its key components and the importance of proper functioning. Overview Of The Bmw X3 Drivetrain System The drivetrain system of the BMW X3 is designed to provide optimal performance and ensure a smooth driving experience. It consists of several interconnected components that work together to transfer power generated by the engine to the wheels. These components include the transmission, driveshaft, differential, and axles. The transmission is responsible for converting the engine’s power into different gear ratios, allowing the car to accelerate or decelerate smoothly. The driveshaft is a rotating tube that transfers power from the transmission to the differential, which distributes power between the wheels. The axles connect the differential to the wheels, allowing them to rotate and propel the vehicle forward. Key Components Of The Drivetrain System To understand the BMW X3 drivetrain system better, let’s take a closer look at its key components: 1. Transmission: The transmission is an essential part of the drivetrain system, as it determines the speed and torque of the wheels. In the BMW X3, you will find an advanced automatic transmission system that offers seamless gear shifting and enhances overall driving dynamics. 2. Driveshaft: The driveshaft plays a critical role in transferring power from the transmission to the differential. It needs to be precisely balanced and aligned to avoid vibrations and ensure efficient power transfer. 3. Differential: The differential is responsible for distributing power between the wheels while allowing them to rotate at different speeds, especially during turns. This helps maintain stability and traction, ensuring a safe and enjoyable driving experience. 4. Axles: The axles connect the wheels to the differential, transferring power from the drivetrain system to the wheels. They need to be sturdy and well-maintained to withstand the stresses of acceleration, braking, and turning. Importance Of Proper Functioning Of The Drivetrain System The proper functioning of the drivetrain system is crucial for the overall performance and safety of the BMW X3. Here are a few reasons why: 1. Performance: A well-functioning drivetrain system ensures smooth power delivery, allowing the vehicle to accelerate quickly and efficiently. Any issues with the drivetrain can lead to poor performance, sluggish acceleration, and reduced fuel efficiency. 2. Safety: The drivetrain system plays a significant role in maintaining stability and traction on the road. A malfunctioning system can affect the vehicle’s handling, especially during slippery or challenging driving conditions. It is important to promptly address any drivetrain issues to ensure maximum safety. 3. Cost-Efficiency: Ignoring drivetrain issues can result in significant repair costs down the line. Regular maintenance and addressing any malfunctions promptly can help prevent costly repairs and extend the lifespan of the drivetrain components. In conclusion, a thorough understanding of the BMW X3 drivetrain system can help owners fully appreciate its importance and take necessary steps to maintain its proper functioning. Regular inspections, routine maintenance, and prompt addressing of any issues are crucial for ensuring optimal performance, safety, and longevity of the drivetrain system. Common Symptoms Of Drivetrain Malfunction When it comes to the BMW X3, a drivetrain malfunction can be a frustrating issue to deal with. The drivetrain is an essential part of the vehicle’s performance, responsible for transferring power from the engine to the wheels. When this system experiences any malfunction, it can greatly affect the overall driving experience. In this article, we will explore the common symptoms of drivetrain malfunction in the BMW X3, so you can identify and address these issues promptly. Identifying Warning Signs Of Drivetrain Issues If you suspect a drivetrain malfunction in your BMW X3, there are a few warning signs you can look out for. These indicators will help you identify potential issues before they become more severe. Here are three common warning signs of drivetrain problems: Check Engine Light: One of the most noticeable signs of a drivetrain malfunction is the illumination of the check engine light on the dashboard. This indicator should never be ignored, as it often suggests an underlying problem with the drivetrain. Strange Odors: If you notice any unusual smells, such as burning rubber or a distinct fluid-like odor, it could be an indication of drivetrain issues. These smells may be accompanied by other symptoms such as smoke or leaks, requiring immediate attention. Fluid Leaks: Another warning sign of a potential drivetrain malfunction is the presence of fluid leaks underneath the vehicle. These leaks can come from various components of the drivetrain, such as the transmission, differential, or transfer case. If you notice any puddles or dripping fluids, it is crucial to have it inspected by a professional technician. Unusual Noises And Vibrations In addition to warning signs, drivetrain malfunctions can also manifest through unusual noises and vibrations. These auditory and tactile cues may indicate specific issues within the drivetrain system. Pay attention to the following signs: Whining or Grinding Noise: If you hear a high-pitched whining

Bmw X3 Drivetrain Malfunction : Troubleshoot and Resolve Read More »

Jeep Commander Transmission Over Temp

Jeep Commander Transmission Over Temp : Discover the Solutions

Jeep Commander Transmission Over Temp is a warning indicating that the transmission is overheating. This can be caused by a variety of factors, such as low fluid levels, a malfunctioning cooling system, or excessive towing or off-roading. Welcome to our comprehensive guide on Jeep Commander Transmission Over Temp. If you’ve encountered this warning on your Jeep Commander, it’s crucial to address it promptly to prevent any further damage to your vehicle’s transmission system. The Transmission Over Temp warning typically appears when the transmission fluid reaches excessive temperatures, which can negatively impact the performance and lifespan of your transmission. In this guide, we’ll delve into the common causes of this issue, offer troubleshooting tips, and provide recommendations on how to fix the problem. Stay tuned to learn more about resolving the Jeep Commander Transmission Over Temp issue effectively. Understanding Jeep Commander Transmission Overheating Issues It is crucial for Jeep Commander owners to be aware of the signs and symptoms of transmission overheating. Ignoring these signs can lead to serious damage to the transmission system and costly repairs. Here are some common symptoms to look out for: Burning smell: A strong burning smell, often resembling the scent of overheated oil, may indicate an overheating transmission. Persisting odor should never be ignored. Warning light: The Transmission Over Temperature (TOT) warning light appearing on the dashboard is a clear indication of transmission overheating. As soon as this light appears, it is essential to take immediate action. Slipping gears: A transmission operating at an excessively high temperature may cause gear slippage or difficulty in shifting gears smoothly. If you notice any irregularities in gear shifting, it is advisable to address the issue promptly. Fluid leakage: Overheating can cause damage to the transmission’s seals, resulting in fluid leakage. If you find any reddish-brown colored fluid underneath your Jeep Commander, it may be a sign of a transmission overheating problem. Engine overheating: Transmission overheating can also lead to engine overheating. If your vehicle’s engine temperature gauge rises quickly without any apparent reason, it might be related to transmission problems. Common causes of transmission overheating in Jeep Commanders Several factors can contribute to the overheating of Jeep Commander transmissions. Identifying these common causes can help owners take preventive measures and avoid transmission damage. Some common causes of transmission overheating include: Low fluid levels: Insufficient transmission fluid or a leak can cause the system to run hotter than normal. Regularly checking and maintaining proper fluid levels is essential to prevent overheating. Faulty cooling system: A malfunctioning transmission cooler or radiator can result in inadequate heat dissipation, leading to transmission overheating. Ensuring the cooling system is in good working order is crucial. Driving conditions: Heavy towing, extreme off-roading, or continuous stop-and-go driving can generate excessive heat and strain on the transmission, increasing the risk of overheating. Overloading: Overloading your Jeep Commander beyond its recommended capacity can put extra stress on the transmission, causing it to overheat. Faulty thermostat: A faulty thermostat can disrupt the cooling system’s function, leading to higher transmission temperatures. Regular maintenance can help detect and replace faulty thermostats early on. Importance of addressing transmission overheating promptly Dealing with transmission overheating issues promptly is essential to maintain the longevity and performance of your Jeep Commander. Ignoring the signs and causes of transmission overheating can result in severe consequences, including complete transmission failure. Here are the main reasons why addressing transmission overheating promptly is of utmost importance: Prevention of further damage: Prompt action taken at the first signs of transmission overheating can prevent further damage to the transmission system. This proactive approach can save Jeep Commander owners from costly repairs and potential downtime. Preservation of transmission lifespan: Overheating causes excessive wear and tear on transmission components, shortening their lifespan significantly. By addressing overheating issues promptly, owners can extend the longevity of their transmission system, avoiding premature failures. Maintaining performance and reliability: An overheated transmission can negatively affect the overall performance and reliability of the Jeep Commander. Promptly addressing transmission overheating ensures optimal functioning, ensuring a smoother and safer driving experience. Resale value preservation: A well-maintained transmission system with a history of prompt intervention in case of overheating issues adds value to the Jeep Commander when it comes time to sell or trade-in. Potential buyers will appreciate a vehicle with a reliable transmission system. Preventive Measures To Avoid Jeep Commander Transmission Overheating Experiencing the infamous “Jeep Commander Transmission Over Temp” warning is something no driver wants to go through. Not only can it be a major inconvenience, but it can also lead to costly repairs. Fortunately, there are several preventive measures you can take to avoid your Jeep Commander’s transmission from overheating. By implementing these simple tips and tricks, you can ensure the longevity and optimal performance of your vehicle’s transmission system. Regular Maintenance Tips For The Transmission System Regular maintenance is key when it comes to preventing overheating issues in your Jeep Commander’s transmission system. Follow these maintenance tips to keep your transmission running smoothly: Regularly change the transmission fluid as recommended by the manufacturer. Fresh transmission fluid acts as a coolant and lubricant to prevent excessive heat buildup. Inspect the transmission for any signs of leaks or damage. Addressing these issues promptly can prevent them from escalating and causing overheating. Ensure that the transmission system’s components, such as the filter and pan gasket, are regularly inspected and replaced if necessary. Faulty components can impede the proper functioning of the transmission and lead to overheating. Checking And Maintaining Proper Fluid Levels Proper fluid levels are crucial for the efficient operation of your Jeep Commander’s transmission. Here’s how you can check and maintain fluid levels: Locate the transmission dipstick, typically marked with a bright color or labeled “Transmission”. With the engine running and the transmission in Park, remove the dipstick and wipe it clean with a lint-free cloth. Reinsert the dipstick fully and then remove it again to check the fluid level. Ensure that the level is within the recommended range, as indicated on the dipstick. If the fluid

Jeep Commander Transmission Over Temp : Discover the Solutions Read More »